Snō Quick Start
Have a Snō + SnōMākr Kit?
Please use the Snō + SnōMākr Quick Start Guide.

1 Introduction
Snō is an FPGA-based development board in a compact, ready-for-integration footprint. It is programmed with the popular and easy to use Arduino IDE.
The following steps will guide you through the process of getting your Snō board up and running.
2 Installing the Arduino IDE and FTDI Drivers
2.1 Arduino IDE Software Installation for Microsoft Windows and macOS
The first step in setting up your computer to connect to and program the Snō is to install the standard Arduino IDE software. Follow the instructions below to install the Arduino IDE on your computer.
Microsoft Windows
- Click here for the official Arduino IDE installation guide for Microsoft Windows.
- Follow the instructions for installing the IDE.
- Once the IDE is installed, return here to finish installation of the Alorium Technology board specific packages and libraries.
Mac OS X
- Click here for the official Arduino IDE installation guide for Mac OS X.
- Follow the instructions for installing the IDE.
- Once the IDE is installed, return here to finish installation of the Alorium Technology board specific packages and libraries.
Linux
If you are running Linux, the setup steps are a bit different. Therefore, we have created one tutorial that incorporates all of the steps Linux requires to setup Arduino IDE. Click the link below to see our Linux Setup Tutorial:
After completing this tutorial, you will be able to fast forward to Step 3!
2.2 FTDI Driver Installation
Snō is programmed with the Arduino IDE across an FTDI interface on one end of the board.
A USB-to-FTDI adapter of some kind will be required to connect your computer to Snō for programming with Arduino. There are a variety of cables and solutions available on the market. One of our favorites is the SparkFun Beefy 3 Basic FTDI Breakout.
In order to communicate with the FTDI breakout board, drivers for the FTDI chip may need to be installed. A great set of instructions for installing the driver can be found here:
The SparkFun guide will tell you if you need to install the driver. You may need to reboot your computer after installation.
A note about FTDI drivers and Mac OS:
If you are running Mac OS, you may run into issues with the usb serial port disappearing and not reconnecting. There are known issues between the factory installed Mac OS FTDI drivers and drivers available for installation from FTDI directly. And, unfortunately, the jury still appears to be out on which version of Mac OS will work consistently without ever seeing the lost serial port problem.
The following video on our YouTube channel provides the steps for a potential fix to this Mac related issue that has worked for several of us at Alorium Technology since the summer of 2017. It’s no iron-clad guarantee, but it seems to have solved the problem so far.
2.3 Test Drive as an Arduino Uno Clone
If you have installed the Arduino IDE and the FTDI driver and want to give it a quick test-drive, you can go back to those first instructions (in Section 2.1, above) to connect your Snō and run your first sketch.
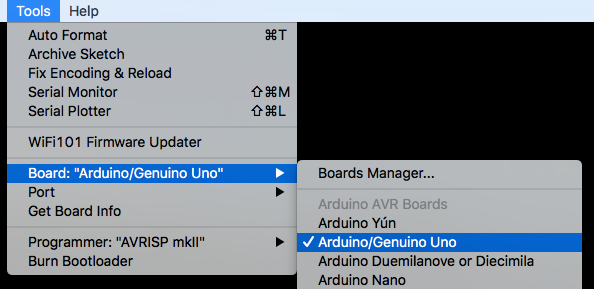
Our XLR8 family of boards are all compatible to Arduino Uno functionality, so you can simply select “Arduino/Genuino Uno” from the Tools > Boards dropdown menu:
At this point, Snō will function just like an Arduino Uno, and you can run an example sketch such as “Blink” to check that everything is working.
2.4 Congratulations!
You’re up and running with your Snō board! If you want to take the next step and make use of the FPGA Xcelerator Blocks preinstalled on you Snō, then continue with Section 3.
3 Snō Board Support Package and Libraries
To take advantage of the XBs that come with Snō, you’ll need to take the following additional steps.
Note: All of the boards in the XLR8 family are supported with the top-level XLR8 boards package and XLR8 Arduino libraries. So, you will be downloading and installing files that have the XLR8 name. This is the correct thing to do for the Snō board as the libraries support both XLR8 and Snō.
3.1 Add XLR8 Board Support
Add board support for our products.
- For Windows and LInux: Go to File > Preferences, in your Arduino IDE menu bar.
- For Mac: Go to Arduino > Preferences, in your Arduino IDE menu bar.
- Locate the ‘Additional Boards Manager URLs’ input field.
- Paste this URL into the “Additional Boards Manager URLs” input field
Note: multiple URLs can be added to this field by separating each URL with a comma.
Install Alorium’s XLR8 board package
- Go to Tools > Board > Boards Manager.
- Type “alorium,” in the search field and you will see an option to install board files for Alorium Arduino compatible boards.
- Select the “Alorium XLR8 Boards” package and then click “Install.”

- Go to Tools > Board. You should see a new section titled “Alorium XLR8 Boards” now exists. Under this new heading should be the XLR8 board. You can select the XLR8 board just like you would normally select the “Arduino/Genuino Uno” board.
- Select your new XLR8 board from the Board menu.
After loading the XLR8 board support, you’ll see a new section for Alorium XLR8 Boards when looking at the Tools > Board menu.

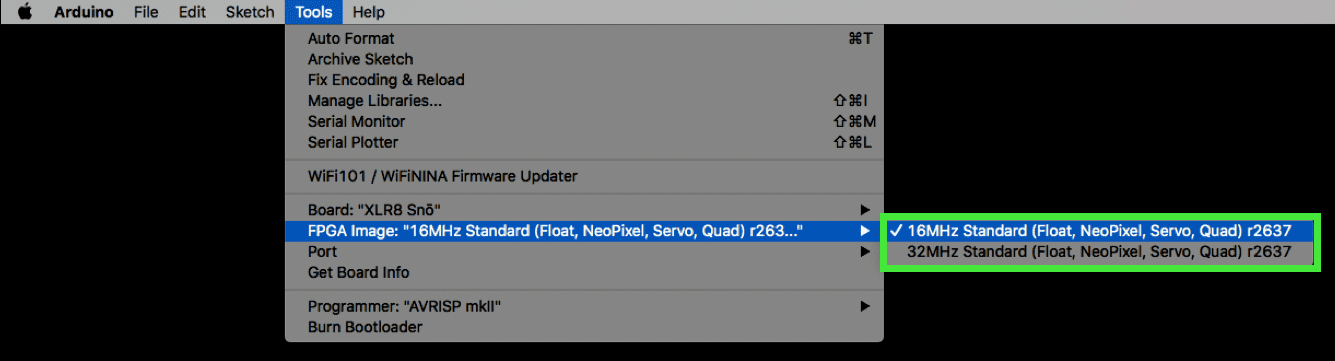
After selecting Snō, you will find a new menu item at Tools > FPGA Image, where you will see the two released Snō FPGA images.
3.2 XLR8 Libraries
Installing the XLR8 board support will also install a default set of libraries that are needed to take advantage of the extra capabilities of Snō. You can see these libraries listed in the Sketch > Include Library menu.
There are additional libraries available that can be installed using the Library Manager. In the Arduino IDE, go to the menu Sketch > Include Library > Manage Libraries, which will open the Library Manager in a new window. Enter Alorium in the search bar and you will find the entries for the various XLR8 and Snō libraries available.

There are many libraries you can install to support a variety of our board functions and Xcelerator Blocks. For the purposes of this getting started guide, find the “XLR8Info” library and click on it.

An Install button will appear for it. Click on the Install button, and when the installation is complete you will see that the library is now tagged as Installed.
After adding the library, you’ll find it in the menu Sketch > Include Library, under Contributed Libraries (You may need to re-start the IDE if you don’t see it).
You’ll also find some examples sketches in the File > Examples menu, under the library name.
3.3 Running with an Xcelerator Block (XB)
To run with the XLR8Info XB and library, do the following:
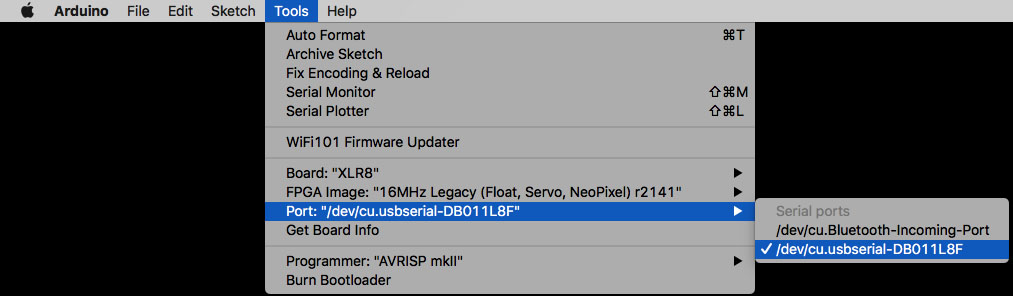
- Connect Snō to your computer with a USB cable, and set up the Port and Serial Monitor as you normally would
- Go to Tools > Port and verify that Arduino IDE is connected to the XLR8 USB serial port.
- Go to Tools > Board and select the XLR8 board
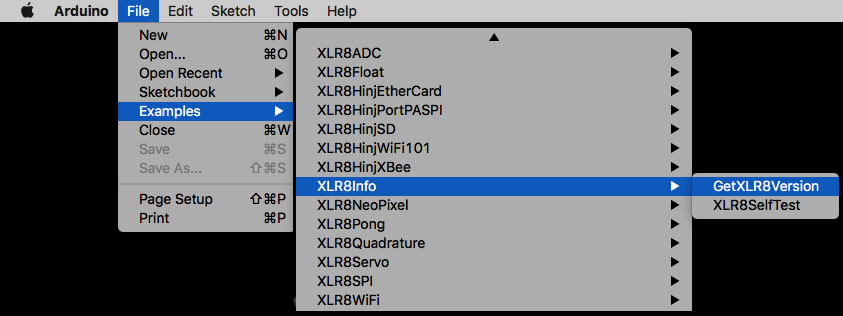
- Go to File > Examples > XLR8Info and select GetXLR8Version
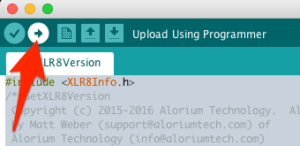
- In the GetXLR8Version sketch window, click on the Upload button
- Check the Serial Monitor window for the output, which should look like the output below. Note that you will need to set the baud rate for the Serial Monitor to 115200 for this sketch to display output correctly.
================================================
Board Type: Sno
FPGA Image: 16 MHz Float Servo  r1682
================================================
XLR8 Hardware Version = 1682
XLR8 CID              = 0x44C4E600
------------------------------------------------
Design Configuration  = 0x8
  Image     = 1
  Clock     = 16 MHz
  PLL Speed = 16MHz
  FPGA Size = M16
------------------------------------------------
XB_ENABLE             = 0x7
  Has Floating Point Add, Subtract, and Multiply
  Has Floating Point Divide
  Has Servo XB
------------------------------------------------
Int Osc = 87.84 MHz
------------------------------------------------
3.4 Register your Snō board
You’ll note in the output from the XLR8Version sketch there is a pre-formatted URL to submit the results of the XLR8Version sketch. Please copy this URL from your Serial Monitor window and enter it into your browser! It will take you to our Registration and Board Info page so that you can both register as an owner and also let us know what board you’re using. This will help us support you in your use of Snō.
3.5 Congratulations Again!
You’ve now got the ability to use the XBs that come preinstalled on your Snō. Now you can make use of the Floating Point, Servo and NeoPixel XBs, by loading their libraries as well.
4 Alternative FPGA Images
4.1 About Alternative FPGA Images
FPGA stands for Field Programmable Gate Array, which means that the functionality inside the FPGA can be overwritten with a completely new set of functions, sort of like flashing your firmware. For Snō, we use this ability to allow you to swap out one set of XBs for another.
4.2 Selecting Alternative FPGA Images
To select an alternate FPGA image, go to the tools > FPGA Images menu in the Arduino IDE to find the list of available images. Select the images with the features you need.
4.3 Close the Serial Monitor
Before burning the new FPGA image, you must be sure that the Arduino Serial Monitor window is closed. If the window is left open, it will interfere with the serial communication for uploading the FPGA, and you will get an error that looks like this:
     Using port /dev/cu.usbserial-DN02AZIM
     ERROR: USB/Serial connection:
          [Errno 16] could not open port /dev/cu.usbserial-DN02AZIM: [Errno 16] Resource busy: '/dev/cu.usbserial-DN02AZIM'
     Available ports:
          0: port=/dev/cu.Bluetooth-Incoming-Port
          1: port=/dev/cu.usbserial-DN02AZIM
4.4 Burn the Image
To write the selected image to the FPGA chip on the Snō, go to the Tools menu in the Arduino IDE and select Burn Bootloader. You will see in your code window a notice in the message area that the image is being burned, which takes a minute or so, after which you should see a message in the text console like this:
INFO: Arduino: Using port /dev/cu.usbserial-DB00KO28
Switching FPGA configuration to existing image 1
INFO: Complete
If you get an error when burning, make sure you have closed the Serial Monitor window.
4.5 Try It Out
Now re-run the GetXLR8Version program as described in Section 3.3 and you should see that the FPGA Image has changed:
 ============================================================
 Board Type: Sno
 FPGA Image: 32 MHz Servo Quad r2141
 ============================================================
 XLR8 Hardware Version = 2141
    Modified working copy
 XLR8 CID              = 0x98A8CE00
 ------------------------------------------------------------
 Design Configuration  = 0x6A
     Image     = 1
     Clock     = 32 MHz
     PLL Speed = 16MHz
     FPGA Size = M16
 ------------------------------------------------------------
 XB_ENABLE             = 0xA
     Has Servo XB
     Has Quadrature XB
 ------------------------------------------------------------
 Int Osc = 86.17 MHz
 ------------------------------------------------------------
4.6 You are now an Expert!
Congratulations! Now start exploring all the other capabilities of Snō.
5 Schematics and Layout
View schematics and layout here: https://aloriumtech.com/documents/Sno_Schematic.pdf
6 Restoring Factory FPGA Image
One of the most awesome things about Snō is its reconfigurability. Snō is able to hold two different FPGA images. One of those, Image 1, can be reconfigured from the Arduino IDE to take advantage of increased functionality as new XBs are introduced. The reconfiguration files are obtained by installing our Arduino Board package as described in the instructions at https://github.com/AloriumTechnology/Arduino_Boards.
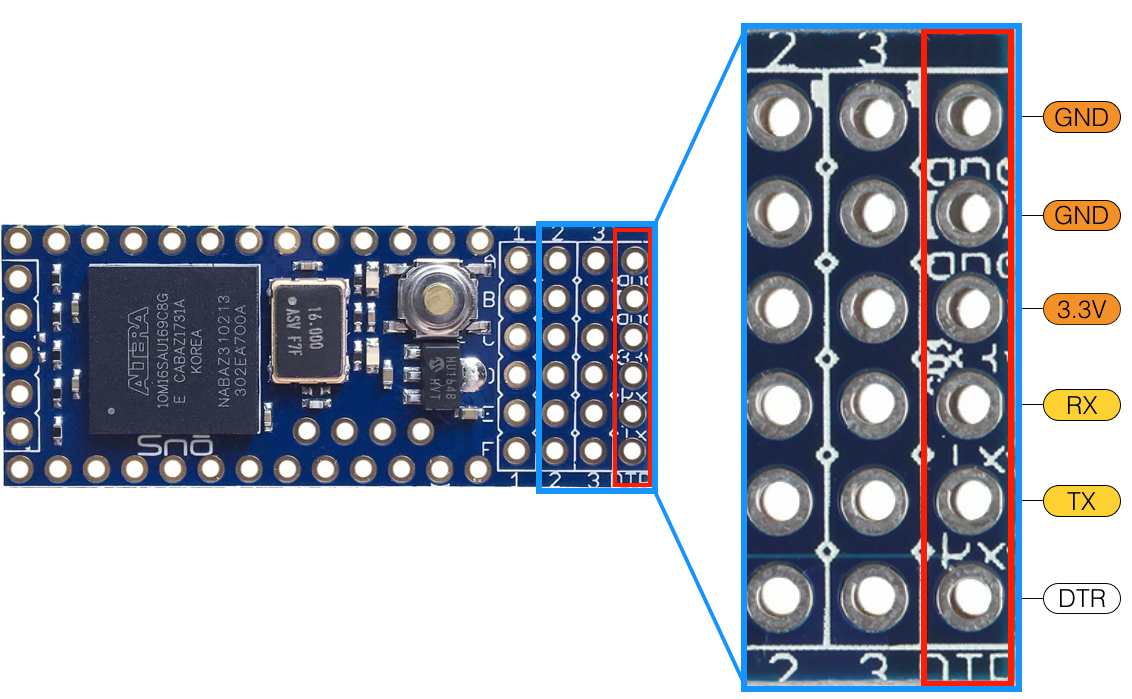
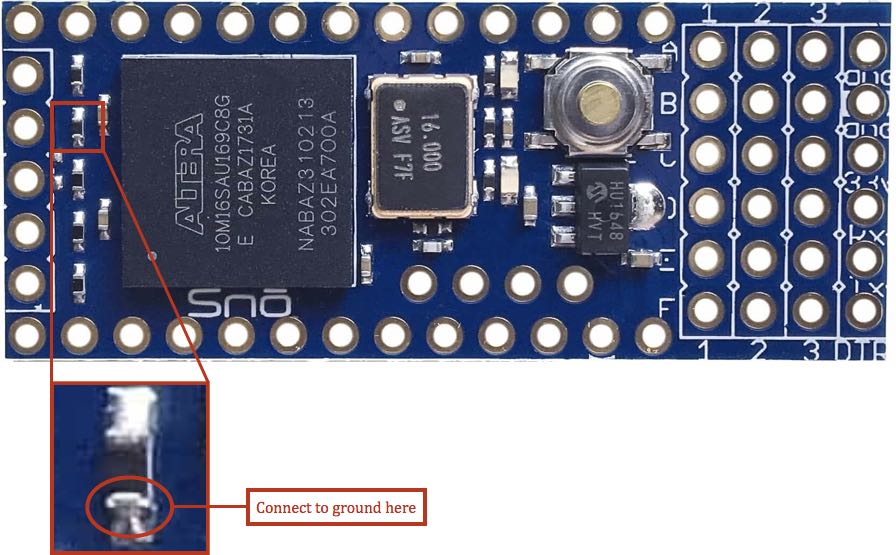
The other image, Image 0, is never changed and is typically unused unless the primary image 1 becomes corrupted. If necessary, a “factory reset” of Snō can be performed by grounding the FPGA side of R5 (cfg_sel) while applying power to the board. It only takes a momentary grounding to cause this to happen. The factory image is then loaded. Any loss of power to the board will still cause the corrupted image to be reloaded, however. Typically, the user will want to reburn a known-good image into image 1 before proceeding.
6.1 Connecting to Ground
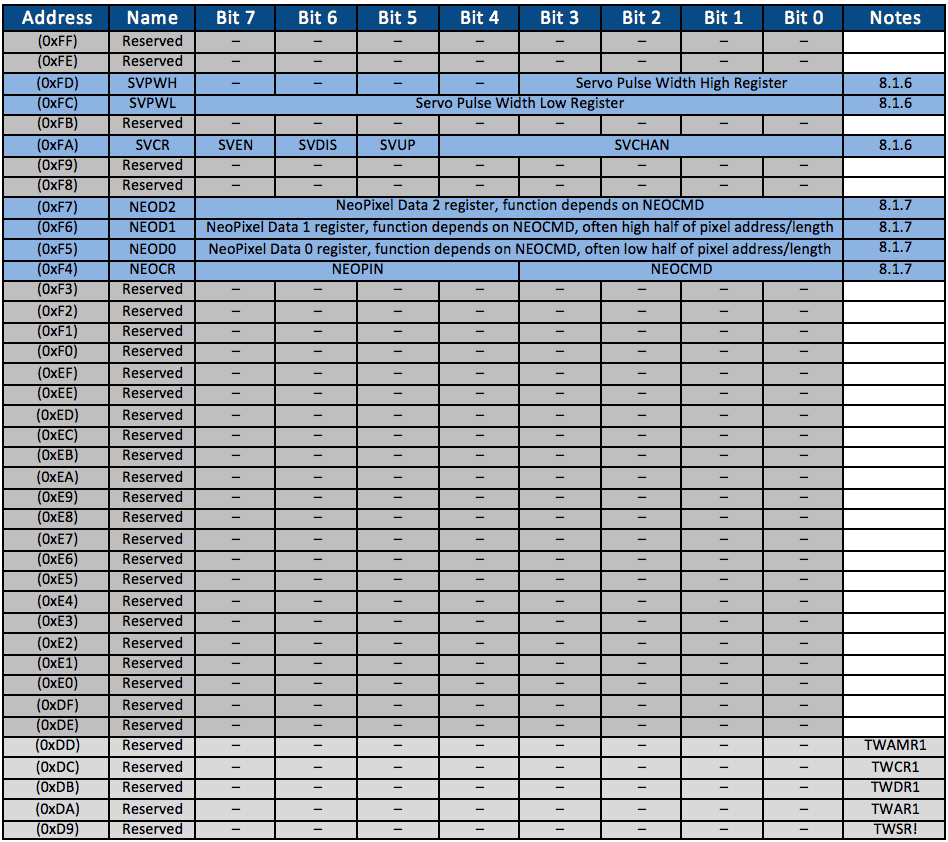
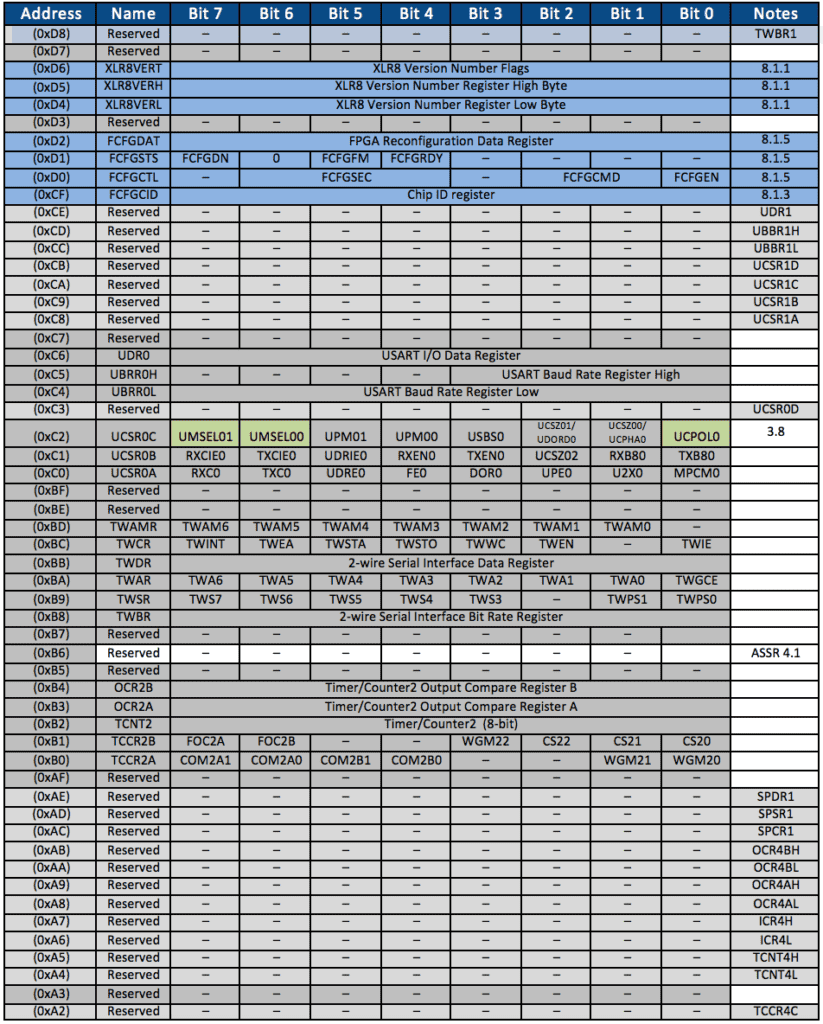
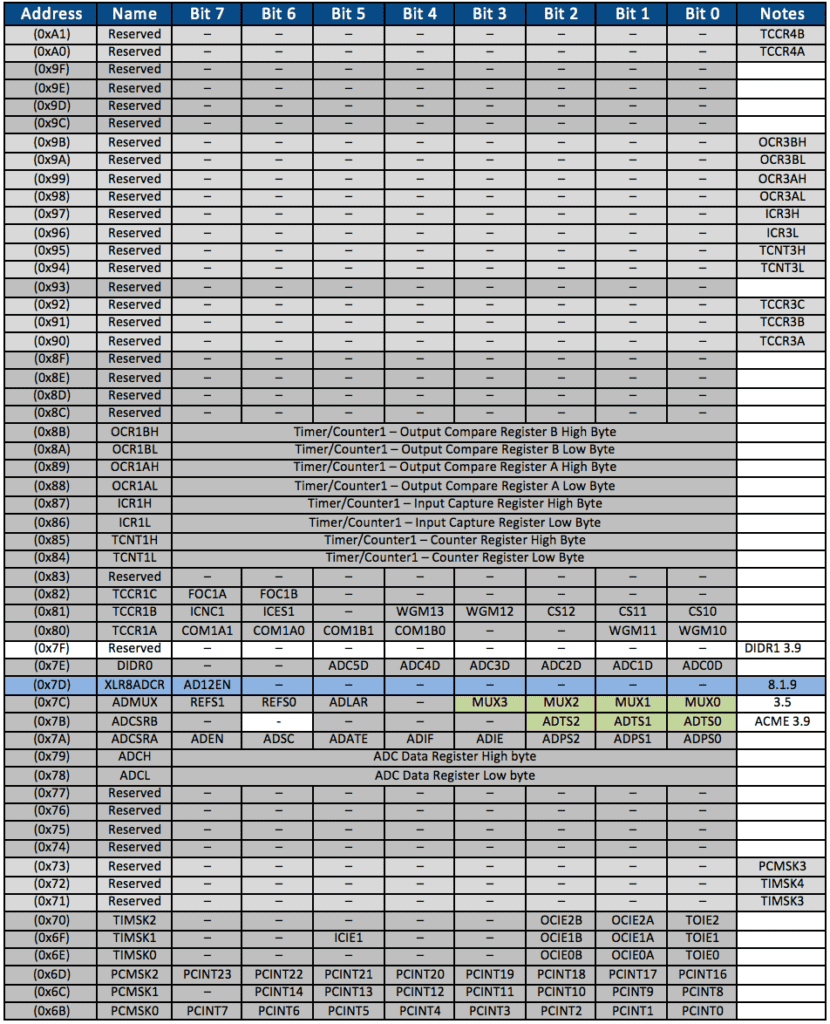
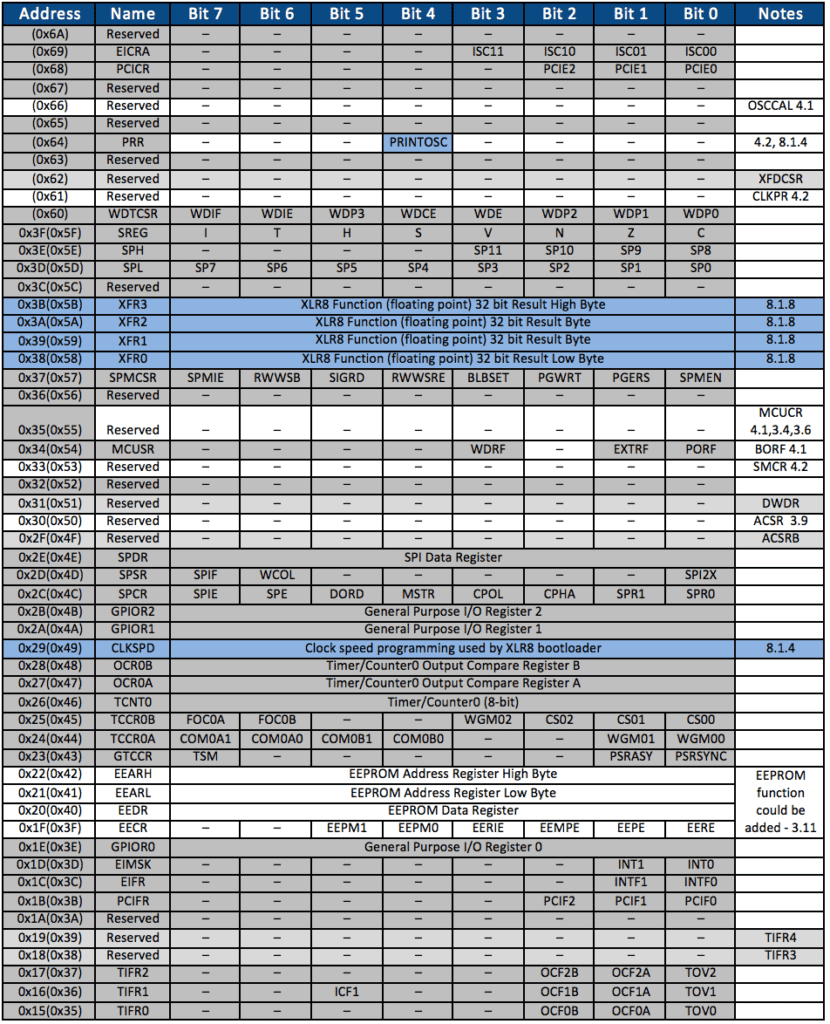
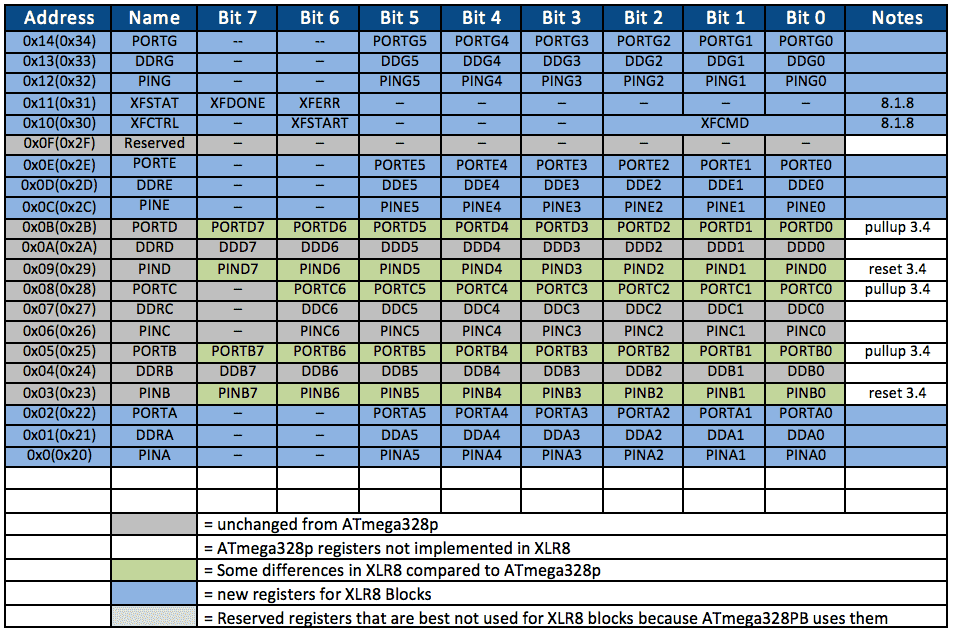
7 Register Summary
The registers used in Snō are listed below. Those with a grey background have identical function to the equivalent ATmega328p register. Those with just a touch of grey are reserved in both XLR8 and ATmega328p but are noted because they are used in the ATmega328pb. Those with green background function like the equivalent ATmega328p register, but with some differences as noted. Those with blue background are new registers added for Snō functions. Those with white background are ATmega328p registers that do not exist in Snō.
7.1 Ports A, E and G
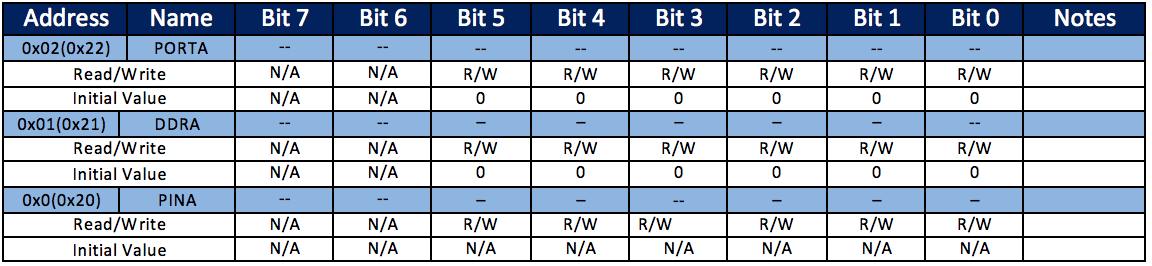
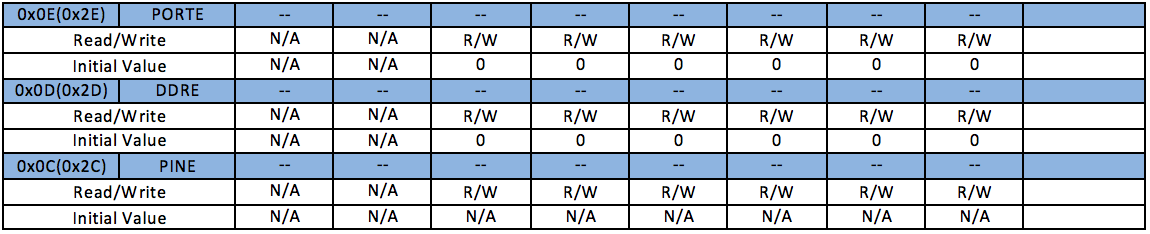
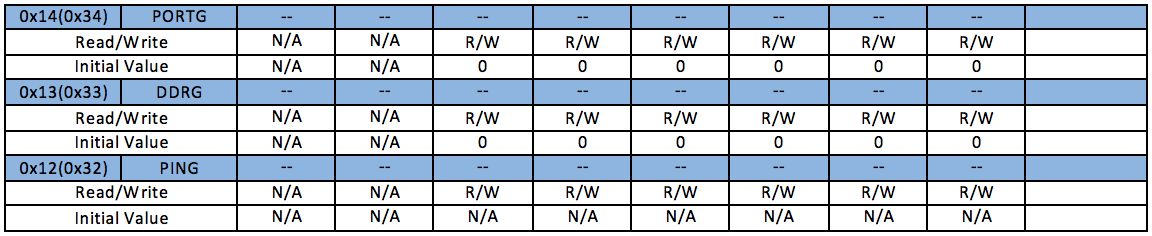
Additional digital I/O pins were added (18 pins) and grouped into 3 ports of 6 bits each. These registers describe how to access the new I/O’s as ports.
7.2 Snō Register Descriptions
7.2.1 XLR8VERL, XLR8VERH, XLR8VERT – Version Number Registers

The version number register provides the FPGA design revision, while the version flags register indicates if the build had a mixed or modified version. The registers have a constant value for a particular design, but the value changes for each version. The easiest way to use these registers is with the XLR8Info library (https://github.com/AloriumTechnology/XLR8Info).
7.2.2 FCFGCID – Chip ID Register

The chip ID register is a read-only register that provides chip ID information. Multiple bytes of chip ID information are available and each read presents the next byte. Writing the register (with any value) resets the read pointer back to the beginning (and does not store the write data in any way).
7.2.3 CLKSPD – Clock Speed Register
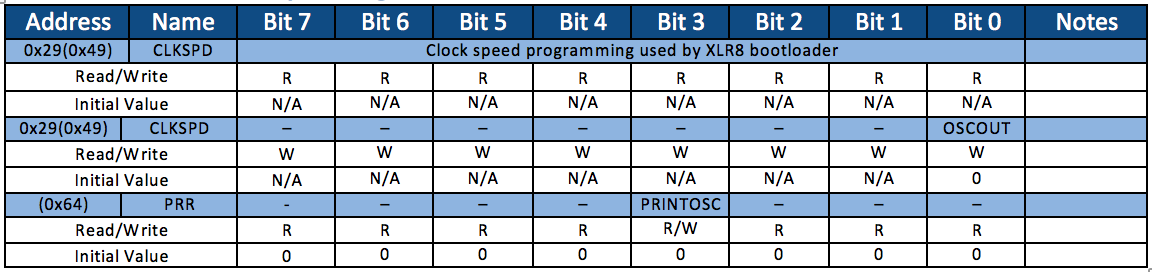
The clock speed register holds a constant value that represents the value to be programmed into the UBRR0L register to run the UART at a baud rate of 115200. It is used by the modified bootloader mentioned in section 3.6 to allow it to run correctly regardless of whether Snō is running 16MHZ, 32MHz, or some other speed.
Snō includes an on-chip oscillator that currently isn’t being used, but a divide-by-1024 version of it can be output to digital pin 8 by writing bit 0 of the CLKSPD register high. This is a write-only operation, it does not change the value that is read from the CLKSPD register. The internal oscillator can be turned off entirely by setting the PRINTOSC bit of the PRR register. As described in section 3.12, the other bits of this register are currently unused.
7.2.4 FCFGDAT, FCFGSTS, FCFGCTL – FPGA Reconfiguration Registers
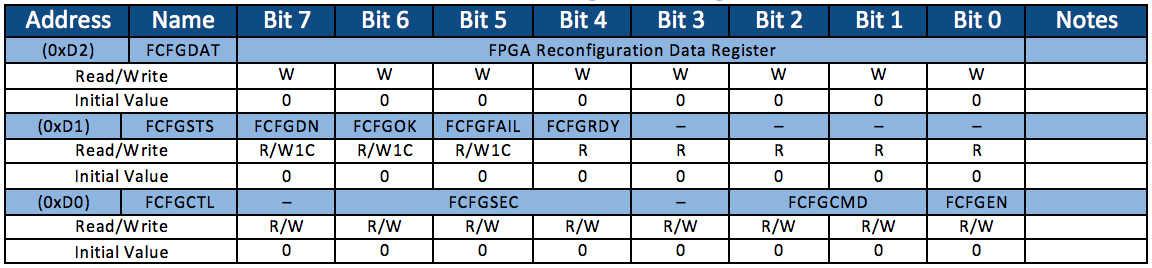
These registers are used during reconfiguration of the FPGA and are not intended for customer use. FCFGEN auto-clears after a reconfiguration is complete. The data register is a write-only register.
8 Credits
Some code is used and modified from the AVR core written by Ruslan Lepetenok (lepetenokr@yahoo.com) that is available at http://opencores.com/project,avr_core. Ruslan’s AVR core does not contain copyright or license notices, but we certainly wish to recognize its contribution to this project.
The I2C module builds upon the I2C core written by Richard Herveille (richard@asics.ws) that is available at http://opencores.org/project,i2c. The I2C core was released under BSD license with the following copyright statement:
Copyright (C) 2001 Richard Herveille richard@asics.ws
This source file may be used and distributed without
restriction provided that this copyright statement is not
removed from the file and that any derivative work contains
the original copyright notice and the associated disclaimer
THIS SOFTWARE IS PROVIDED “AS IS” AND WITHOUT ANY
EXPRESS OR IMPLIED WARRANTIES, INCLUDING, BUT NOT LIMITED
TO, THE IMPLIED WARRANTIES OF MERCHANTABILITY AND FITNESS
FOR A PARTICULAR PURPOSE. IN NO EVENT SHALL THE AUTHOR
OR CONTRIBUTORS BE LIABLE FOR ANY DIRECT, INDIRECT,
INCIDENTAL, SPECIAL, EXEMPLARY, OR CONSEQUENTIAL DAMAGES
(INCLUDING, BUT NOT LIMITED TO, PROCUREMENT OF SUBSTITUTE
GOODS OR SERVICES; LOSS OF USE, DATA, OR PROFITS; OR
BUSINESS INTERRUPTION) HOWEVER CAUSED AND ON ANY THEORY OF
LIABILITY, WHETHER IN CONTRACT, STRICT LIABILITY, OR TORT
(INCLUDING NEGLIGENCE OR OTHERWISE) ARISING IN ANY WAY OUT
OF THE USE OF THIS SOFTWARE, EVEN IF ADVISED OF THE
POSSIBILITY OF SUCH DAMAGE.
All other portions of Snō were designed and verified for Alorium Technology by the excellent team at Superion Technology.
1 Introduction
Snō is an FPGA-based development board in a compact, ready-for-integration footprint. It is programmed with the popular and easy to use Arduino IDE.
The following steps will guide you through the process of getting your Snō board up and running.
2 Installing the Arduino IDE and FTDI Drivers
2.1 Arduino IDE Software Installation for Microsoft Windows and macOS
The first step in setting up your computer to connect to and program the Snō is to install the standard Arduino IDE software. Follow the instructions below to install the Arduino IDE on your computer.
Microsoft Windows
- Click here for the official Arduino IDE installation guide for Microsoft Windows.
- Follow the instructions for installing the IDE.
- Once the IDE is installed, return here to finish installation of the Alorium Technology board specific packages and libraries.
Mac OS X
- Click here for the official Arduino IDE installation guide for Mac OS X.
- Follow the instructions for installing the IDE.
- Once the IDE is installed, return here to finish installation of the Alorium Technology board specific packages and libraries.
Linux
If you are running Linux, the setup steps are a bit different. Therefore, we have created one tutorial that incorporates all of the steps Linux requires to setup Arduino IDE. Click the link below to see our Linux Setup Tutorial:
After completing this tutorial, you will be able to fast forward to Step 3!
2.2 FTDI Driver Installation
Snō is programmed with the Arduino IDE across an FTDI interface on one end of the board.
A USB-to-FTDI adapter of some kind will be required to connect your computer to Snō for programming with Arduino. There are a variety of cables and solutions available on the market. One of our favorites is the SparkFun Beefy 3 Basic FTDI Breakout.
In order to communicate with the FTDI breakout board, drivers for the FTDI chip may need to be installed. A great set of instructions for installing the driver can be found here:
The SparkFun guide will tell you if you need to install the driver. You may need to reboot your computer after installation.
A note about FTDI drivers and Mac OS:
If you are running Mac OS, you may run into issues with the usb serial port disappearing and not reconnecting. There are known issues between the factory installed Mac OS FTDI drivers and drivers available for installation from FTDI directly. And, unfortunately, the jury still appears to be out on which version of Mac OS will work consistently without ever seeing the lost serial port problem.
The following video on our YouTube channel provides the steps for a potential fix to this Mac related issue that has worked for several of us at Alorium Technology since the summer of 2017. It’s no iron-clad guarantee, but it seems to have solved the problem so far.
2.3 Test Drive as an Arduino Uno Clone
If you have installed the Arduino IDE and the FTDI driver and want to give it a quick test-drive, you can go back to those first instructions (in Section 2.1, above) to connect your Snō and run your first sketch.
Our XLR8 family of boards are all compatible to Arduino Uno functionality, so you can simply select “Arduino/Genuino Uno” from the Tools > Boards dropdown menu:
At this point, Snō will function just like an Arduino Uno, and you can run an example sketch such as “Blink” to check that everything is working.
2.4 Congratulations!
You’re up and running with your Snō board! If you want to take the next step and make use of the FPGA Xcelerator Blocks preinstalled on you Snō, then continue with Section 3.
3 Snō Board Support Package and Libraries
To take advantage of the XBs that come with Snō, you’ll need to take the following additional steps.
Note: All of the boards in the XLR8 family are supported with the top-level XLR8 boards package and XLR8 Arduino libraries. So, you will be downloading and installing files that have the XLR8 name. This is the correct thing to do for the Snō board as the libraries support both XLR8 and Snō.
3.1 Add XLR8 Board Support
Add board support for our products.
- For Windows and LInux: Go to File > Preferences, in your Arduino IDE menu bar.
- For Mac: Go to Arduino > Preferences, in your Arduino IDE menu bar.
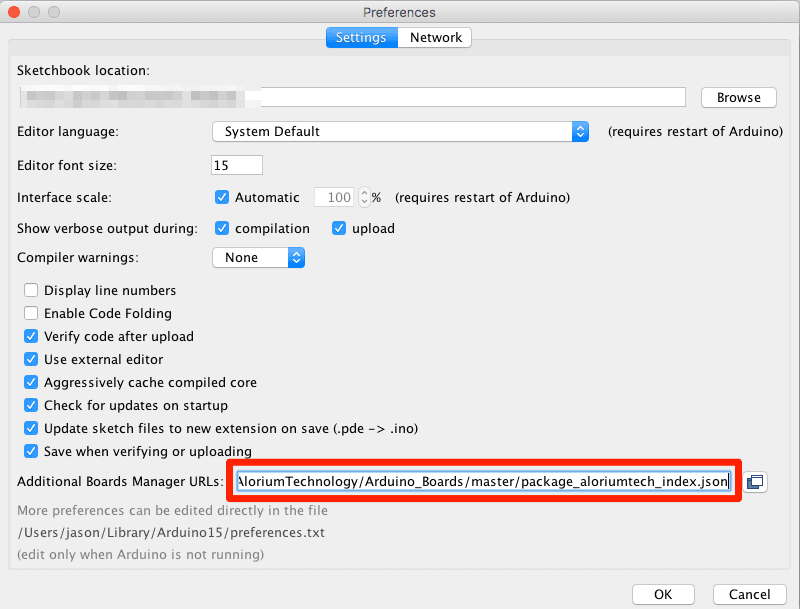
- Locate the ‘Additional Boards Manager URLs’ input field.
- Paste this URL into the “Additional Boards Manager URLs” input field
Note: multiple URLs can be added to this field by separating each URL with a comma.
Install Alorium’s XLR8 board package
- Go to Tools > Board > Boards Manager.
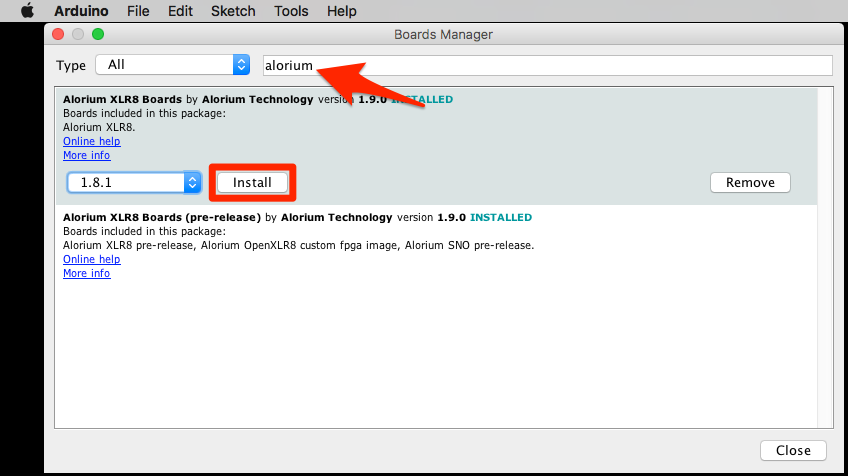
- Type “alorium,” in the search field and you will see an option to install board files for Alorium Arduino compatible boards.
- Select the “Alorium XLR8 Boards” package and then click “Install.”
- Go to Tools > Board. You should see a new section titled “Alorium XLR8 Boards” now exists. Under this new heading should be the XLR8 board. You can select the XLR8 board just like you would normally select the “Arduino/Genuino Uno” board.
- Select your new XLR8 board from the Board menu.
After loading the XLR8 board support, you’ll see a new section for Alorium XLR8 Boards when looking at the Tools -> Board menu.
After selecting Snō, you will find a new menu item at Tools > FPGA Image, where you will find a number of FPGA images that provide different operating speeds and different XB configurations.

3.2 XLR8 Libraries
Installing the XLR8 board support will also install a default set of libraries that are needed to take advantage of the extra capabilities of Snō. You can see these libraries listed in the Sketch > Include Library menu.
There are additional libraries available that can be installed using the Library Manager. In the Arduino IDE, go to the menu Sketch > Include Library > Manage Libraries, which will open the Library Manager in a new window. Enter Alorium in the search bar and you will find the entries for the various XLR8 and Snō libraries available.
There are many libraries you can install to support a variety of our board functions and Xcelerator Blocks. For the purposes of this getting started guide, find the “XLR8Info” library and click on it.
An Install button will appear for it. Click on the Install button, and when the installation is complete you will see that the library is now tagged as Installed.
After adding the library, you’ll find it in the menu Sketch > Include Library, under Contributed Libraries (You may need to re-start the IDE if you don’t see it).
You’ll also find some examples sketches in the File > Examples menu, under the library name.
3.3 Running with an Xcelerator Block (XB)
To run with the XLR8Info XB and library, do the following:
- Connect Snō to your computer with a USB cable, and set up the Port and Serial Monitor as you normally would
- Go to Tools > Port and verify that Arduino IDE is connected to the XLR8 USB serial port.
- Go to Tools > Board and select the XLR8 board
- Go to File > Examples > XLR8Info and select GetXLR8Version
- In the GetXLR8Version sketch window, click on the Upload button
- Check the Serial Monitor window for the output, which should look like the output below. Note that you will need to set the baud rate for the Serial Monitor to 115200 for this sketch to display output correctly.
================================================
Board Type: Sno
FPGA Image: 16 MHz Float Servo  r1682
================================================
XLR8 Hardware Version = 1682
XLR8 CID              = 0x44C4E600
------------------------------------------------
Design Configuration  = 0x8
  Image     = 1
  Clock     = 16 MHz
  PLL Speed = 16MHz
  FPGA Size = M16
------------------------------------------------
XB_ENABLE             = 0x7
  Has Floating Point Add, Subtract, and Multiply
  Has Floating Point Divide
  Has Servo XB
------------------------------------------------
Int Osc = 87.84 MHz
------------------------------------------------
3.4 Register your Snō board
You’ll note in the output from the XLR8Version sketch there is a pre-formatted URL to submit the results of the XLR8Version sketch. Please copy this URL from your Serial Monitor window and enter it into your browser! It will take you to our Registration and Board Info page so that you can both register as an owner and also let us know what board you’re using. This will help us support you in your use of Snō.
3.5 Congratulations Again!
You’ve now got the ability to use the XBs that come preinstalled on your Snō. Now you can make use of the Floating Point, Servo and NeoPixel XBs, by loading their libraries as well.
4 Alternative FPGA Images
4.1 About Alternative FPGA Images
FPGA stands for Field Programmable Gate Array, which means that the functionality inside the FPGA can be overwritten with a completely new set of functions, sort of like flashing your firmware. For Snō, we use this ability to allow you to swap out one set of XBs for another.
4.2 Selecting Alternative FPGA Images
To select an alternate FPGA image, go to the tools > FPGA Images menu in the Arduino IDE to find the list of available images. Select the images with the features you need.
4.3 Close the Serial Monitor
Before burning the new FPGA image, you must be sure that the Arduino Serial Monitor window is closed. If the window is left open, it will interfere with the serial communication for uploading the FPGA, and you will get an error that looks like this:
     Using port /dev/cu.usbserial-DN02AZIM
     ERROR: USB/Serial connection:
          [Errno 16] could not open port /dev/cu.usbserial-DN02AZIM: [Errno 16] Resource busy: '/dev/cu.usbserial-DN02AZIM'
     Available ports:
          0: port=/dev/cu.Bluetooth-Incoming-Port
          1: port=/dev/cu.usbserial-DN02AZIM
4.4 Burn the Image
To write the selected image to the FPGA chip on the Snō, go to the Tools menu in the Arduino IDE and select Burn Bootloader. You will see in your code window a notice in the message area that the image is being burned, which takes a minute or so, after which you should see a message in the text console like this:
INFO: Arduino: Using port /dev/cu.usbserial-DB00KO28
Switching FPGA configuration to existing image 1
INFO: Complete
If you get an error when burning, make sure you have closed the Serial Monitor window.
4.5 Try It Out
Now re-run the GetXLR8Version program as described in Section 3.3 and you should see that the FPGA Image has changed:
 ============================================================
 Board Type: Sno
 FPGA Image: 32 MHz Servo Quad r2141
 ============================================================
 XLR8 Hardware Version = 2141
    Modified working copy
 XLR8 CID              = 0x98A8CE00
 ------------------------------------------------------------
 Design Configuration  = 0x6A
     Image     = 1
     Clock     = 32 MHz
     PLL Speed = 16MHz
     FPGA Size = M16
 ------------------------------------------------------------
 XB_ENABLE             = 0xA
     Has Servo XB
     Has Quadrature XB
 ------------------------------------------------------------
 Int Osc = 86.17 MHz
 ------------------------------------------------------------
4.6 You are now an Expert!
Congratulations! Now start exploring all the other capabilities of Snō.
5 Schematics and Layout
View schematics and layout here: https://aloriumtech.com/documents/Sno_Schematic.pdf
6 Restoring Factory FPGA Image
One of the most awesome things about Snō is its reconfigurability. Snō is able to hold two different FPGA images. One of those, Image 1, can be reconfigured from the Arduino IDE to take advantage of increased functionality as new XBs are introduced. The reconfiguration files are obtained by installing our Arduino Board package as described in the instructions at https://github.com/AloriumTechnology/Arduino_Boards.
The other image, Image 0, is never changed and is typically unused unless the primary image 1 becomes corrupted. If necessary, a “factory reset” of Snō can be performed by grounding the FPGA side of R5 (cfg_sel) while applying power to the board. It only takes a momentary grounding to cause this to happen. The factory image is then loaded. Any loss of power to the board will still cause the corrupted image to be reloaded, however. Typically, the user will want to reburn a known-good image into image 1 before proceeding.
6.1 Connecting to Ground
7 Register Summary
The registers used in Snō are listed below. Those with a grey background have identical function to the equivalent ATmega328p register. Those with just a touch of grey are reserved in both XLR8 and ATmega328p but are noted because they are used in the ATmega328pb. Those with green background function like the equivalent ATmega328p register, but with some differences as noted. Those with blue background are new registers added for Snō functions. Those with white background are ATmega328p registers that do not exist in Snō.
7.1 Ports A, E and G
Additional digital I/O pins were added (18 pins) and grouped into 3 ports of 6 bits each. These registers describe how to access the new I/O’s as ports.
7.2 Snō Register Descriptions
7.2.1 XLR8VERL, XLR8VERH, XLR8VERT – Version Number Registers
The version number register provides the FPGA design revision, while the version flags register indicates if the build had a mixed or modified version. The registers have a constant value for a particular design, but the value changes for each version. The easiest way to use these registers is with the XLR8Info library (https://github.com/AloriumTechnology/XLR8Info).
7.2.2 FCFGCID – Chip ID Register
The chip ID register is a read-only register that provides chip ID information. Multiple bytes of chip ID information are available and each read presents the next byte. Writing the register (with any value) resets the read pointer back to the beginning (and does not store the write data in any way).
7.2.3 CLKSPD – Clock Speed Register
The clock speed register holds a constant value that represents the value to be programmed into the UBRR0L register to run the UART at a baud rate of 115200. It is used by the modified bootloader mentioned in section 3.6 to allow it to run correctly regardless of whether Snō is running 16MHZ, 32MHz, or some other speed.
Snō includes an on-chip oscillator that currently isn’t being used, but a divide-by-1024 version of it can be output to digital pin 8 by writing bit 0 of the CLKSPD register high. This is a write-only operation, it does not change the value that is read from the CLKSPD register. The internal oscillator can be turned off entirely by setting the PRINTOSC bit of the PRR register. As described in section 3.12, the other bits of this register are currently unused.
7.2.4 FCFGDAT, FCFGSTS, FCFGCTL – FPGA Reconfiguration Registers
These registers are used during reconfiguration of the FPGA and are not intended for customer use. FCFGEN auto-clears after a reconfiguration is complete. The data register is a write-only register.
8 Credits
Some code is used and modified from the AVR core written by Ruslan Lepetenok (lepetenokr@yahoo.com) that is available at http://opencores.com/project,avr_core. Ruslan’s AVR core does not contain copyright or license notices, but we certainly wish to recognize its contribution to this project.
The I2C module builds upon the I2C core written by Richard Herveille (richard@asics.ws) that is available at http://opencores.org/project,i2c. The I2C core was released under BSD license with the following copyright statement:
Copyright (C) 2001 Richard Herveille richard@asics.ws
This source file may be used and distributed without
restriction provided that this copyright statement is not
removed from the file and that any derivative work contains
the original copyright notice and the associated disclaimer
THIS SOFTWARE IS PROVIDED “AS IS” AND WITHOUT ANY
EXPRESS OR IMPLIED WARRANTIES, INCLUDING, BUT NOT LIMITED
TO, THE IMPLIED WARRANTIES OF MERCHANTABILITY AND FITNESS
FOR A PARTICULAR PURPOSE. IN NO EVENT SHALL THE AUTHOR
OR CONTRIBUTORS BE LIABLE FOR ANY DIRECT, INDIRECT,
INCIDENTAL, SPECIAL, EXEMPLARY, OR CONSEQUENTIAL DAMAGES
(INCLUDING, BUT NOT LIMITED TO, PROCUREMENT OF SUBSTITUTE
GOODS OR SERVICES; LOSS OF USE, DATA, OR PROFITS; OR
BUSINESS INTERRUPTION) HOWEVER CAUSED AND ON ANY THEORY OF
LIABILITY, WHETHER IN CONTRACT, STRICT LIABILITY, OR TORT
(INCLUDING NEGLIGENCE OR OTHERWISE) ARISING IN ANY WAY OUT
OF THE USE OF THIS SOFTWARE, EVEN IF ADVISED OF THE
POSSIBILITY OF SUCH DAMAGE.
All other portions of Snō were designed and verified for Alorium Technology by the excellent team at Superion Technology.